Frozen Play Dough Kit- DIY Gift for Kids


Laura @inspiremyplay
Founder of @inspiremyplay, Early Years teacher for 11 years and mummy to three gorgeous girls. I'm passionate about about the benefits of play in early childhood.
This post may contain affiliate links. This means that if you click on a link and go on to make a purchase, I may receive a small commission (at no additional cost to you). Please read my disclosure policy for more details.

Get your FREE ebook
For more simple DIY recipes & ideas for sensory play at home download your Beginner's Guide to Sensory Play by subscribing to Inspire My Play today.
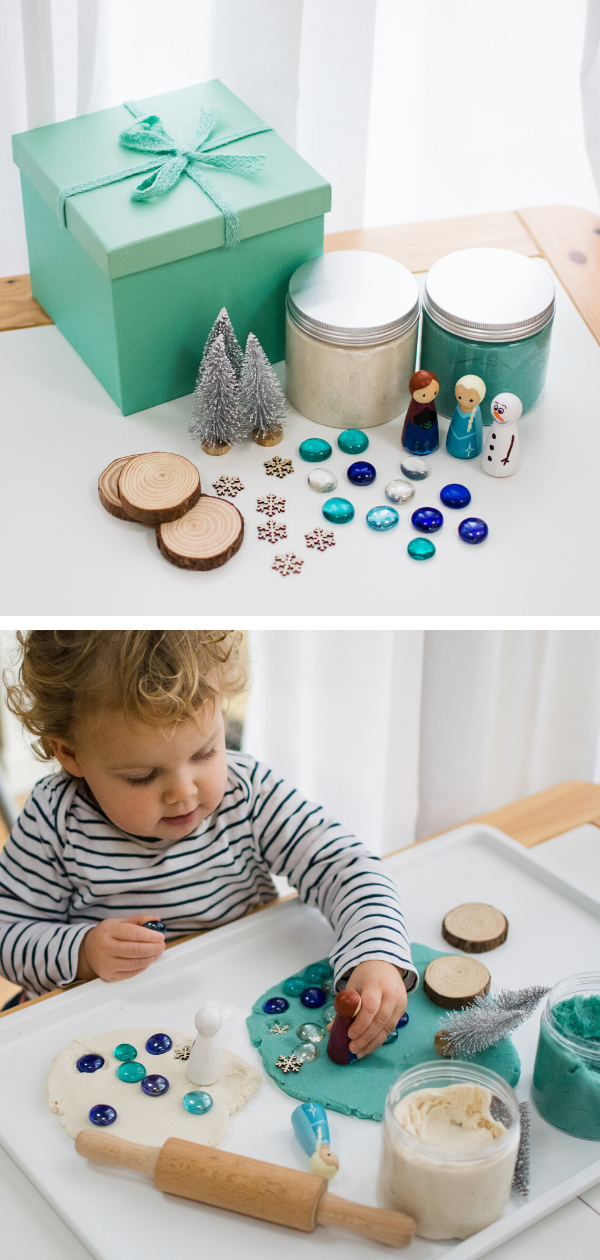
Do you know any Frozen fans? Our DIY Frozen Play dough kit is the perfect gift for all the Anna, Elsa & Olaf enthusiasts out there! Read on to find out how easy it is to put together this unique and fun gift.

In case you don't already know I'm a huge fan of play dough! Not only does it have many therapeutic and developmental benefits but it engages children in a way that few other play activities do, especially when paired with the right resources!
I love setting up themed play dough activities and absolutely love gifting homemade play dough kits to friends. There's no escaping the fact that Frozen is a big deal to kids (and some adults too!). So I thought this Christmas I'd make some of these Frozen play dough kits to gift to a few Frozen fans I know. I love the way this kit embraces the Frozen fever but is a quality gift that will be played with over and over again.

Putting Together a Frozen Play Dough Kit
It can be hard sourcing all the things you need for a project like this so I've tried to make life easier by linking as many products as I can below. With Christmas just days away I realise that if you want to have one of these under the tree you need things fast! So with that in mind I've made sure where I can that the products include prime delivery.
Do read on for all my hints, tips and short cuts to make this a delight rather than a drag to put together!
Play Dough
To make the play dough for this kit follow my super- simple no-cook recipe that you can find by clicking here. It really is so easy and I promise you, once you try it you will never want to buy shop-bought play dough again!
The jars that we use to store our play dough are brilliant. My recipe fills one of the larger jars perfectly or you could halve the quantities to fill the smaller jar.
One of the biggest challenges with this kit was creating white play dough, as naturally it is a beige colour. Mine isn't perfectly white but it's not far off. I achieved this using Wilton White Icing Colour. You do need to be fairly generous and will probably want to add more of it at the kneading stage until you get a shade you are happy with.
The aqua blue was created by adding a small amount of Wilton Royal Blue gel food colouring. As you can see in small quantities it doesn't look very Royal Blue! Start with just a little and you can always add more when kneading if you want it to be more vibrant.
Peg Dolls
The peg dolls are certainly the most time consuming bit. If you feel this is too far out of your comfort zone there's no reason you couldn't buy some mini Frozen figurines instead.
If you are up for it though these peg dolls are not nearly as hard to paint as I thought they'd be and a much cheaper option. I'm no expert and they are not perfect but children don't notice the imperfections like we do!

Before getting down to the painting I suggest lightly drawing the outline in pencil. To make sure everything was symmetrical I found it helpful to draw a line down the middle
I used acrylic paint for the main colours and then added the detail using acrylic paint pens. Be extra careful doing the eyes as the paint is prone to bleed slightly. I learnt the hard way but when I did a second set I dabbed it very lightly with the paint pen and the results were better.
Other Resources

There are no right or wrong things to include with the peg dolls and play dough but I went for a selection of wintry looking resources. It goes without saying to think carefully about the age group that this is aimed for and resource appropriately. Due to the small parts in ours I wouldn't gift this to a child under 3. I let my daughter play with it under close supervision but really for a child under 3 I would omit or replace some of the things.

If you choose to buy the trees a word of caution that they do tend to shed quite a bit. That's not a big problem with the silver ones as it just makes the play dough glittery but the green sisal trees might not be so forgiving. An alternative option is to buy mini wooden trees. Leave them natural or paint them in white or silver and they'd look lovely with this kit.
Finally, lets talk about how to package this gift. This would be the perfect way to gift a PlayTRAY! The resources easily fit inside the PlayTRAY compartments and it also makes playing with it so much more organised!
Whilst the PlayTRAY will preserve your play dough for awhile I recommend wrapping it in some clingfilm first or pop it in the TRAY at the last minute to make sure it is still fresh.

So there's all my tips and recommendations for putting together a Frozen play dough kit. Any questions? Pop them below and if you give this a go be sure to tag me on social media- I'd love to see!


