Valentine's Day Fun for Kids: Sensory, Creative, and Imaginative Play Ideas for Parents


Laura @inspiremyplay
Founder of @inspiremyplay, Early Years teacher for 11 years and mummy to three gorgeous girls. I'm passionate about about the benefits of play in early childhood.
Valentine’s Day isn’t just for grown-ups—it's a wonderful opportunity to create magical moments with your little ones through sensory exploration, creativity and imaginative play. Whether you’re planning a themed afternoon activity or looking for simple ideas to keep your children happily engaged, we’ve rounded up our favourite Valentine's Day play!
So, let's get started and make Valentine's Day fun for kids!

1. Sticky Heart
This sticky heart is a very simple activity that is brilliant for developing fine motor skills.

You’ll need:
- Cardboard heart
- Contact paper (sticky-back plastic)
- Felt Tip Pen
- Craft supplies and loose parts
- PlayTRAY Inserts
How to set it up:
- Cut a heart shape from cardboard.
- Attach contact paper to the back with the sticky side facing up.
- Draw lines or patterns on the heart.
- Offer children a selection of craft materials to place along the lines.

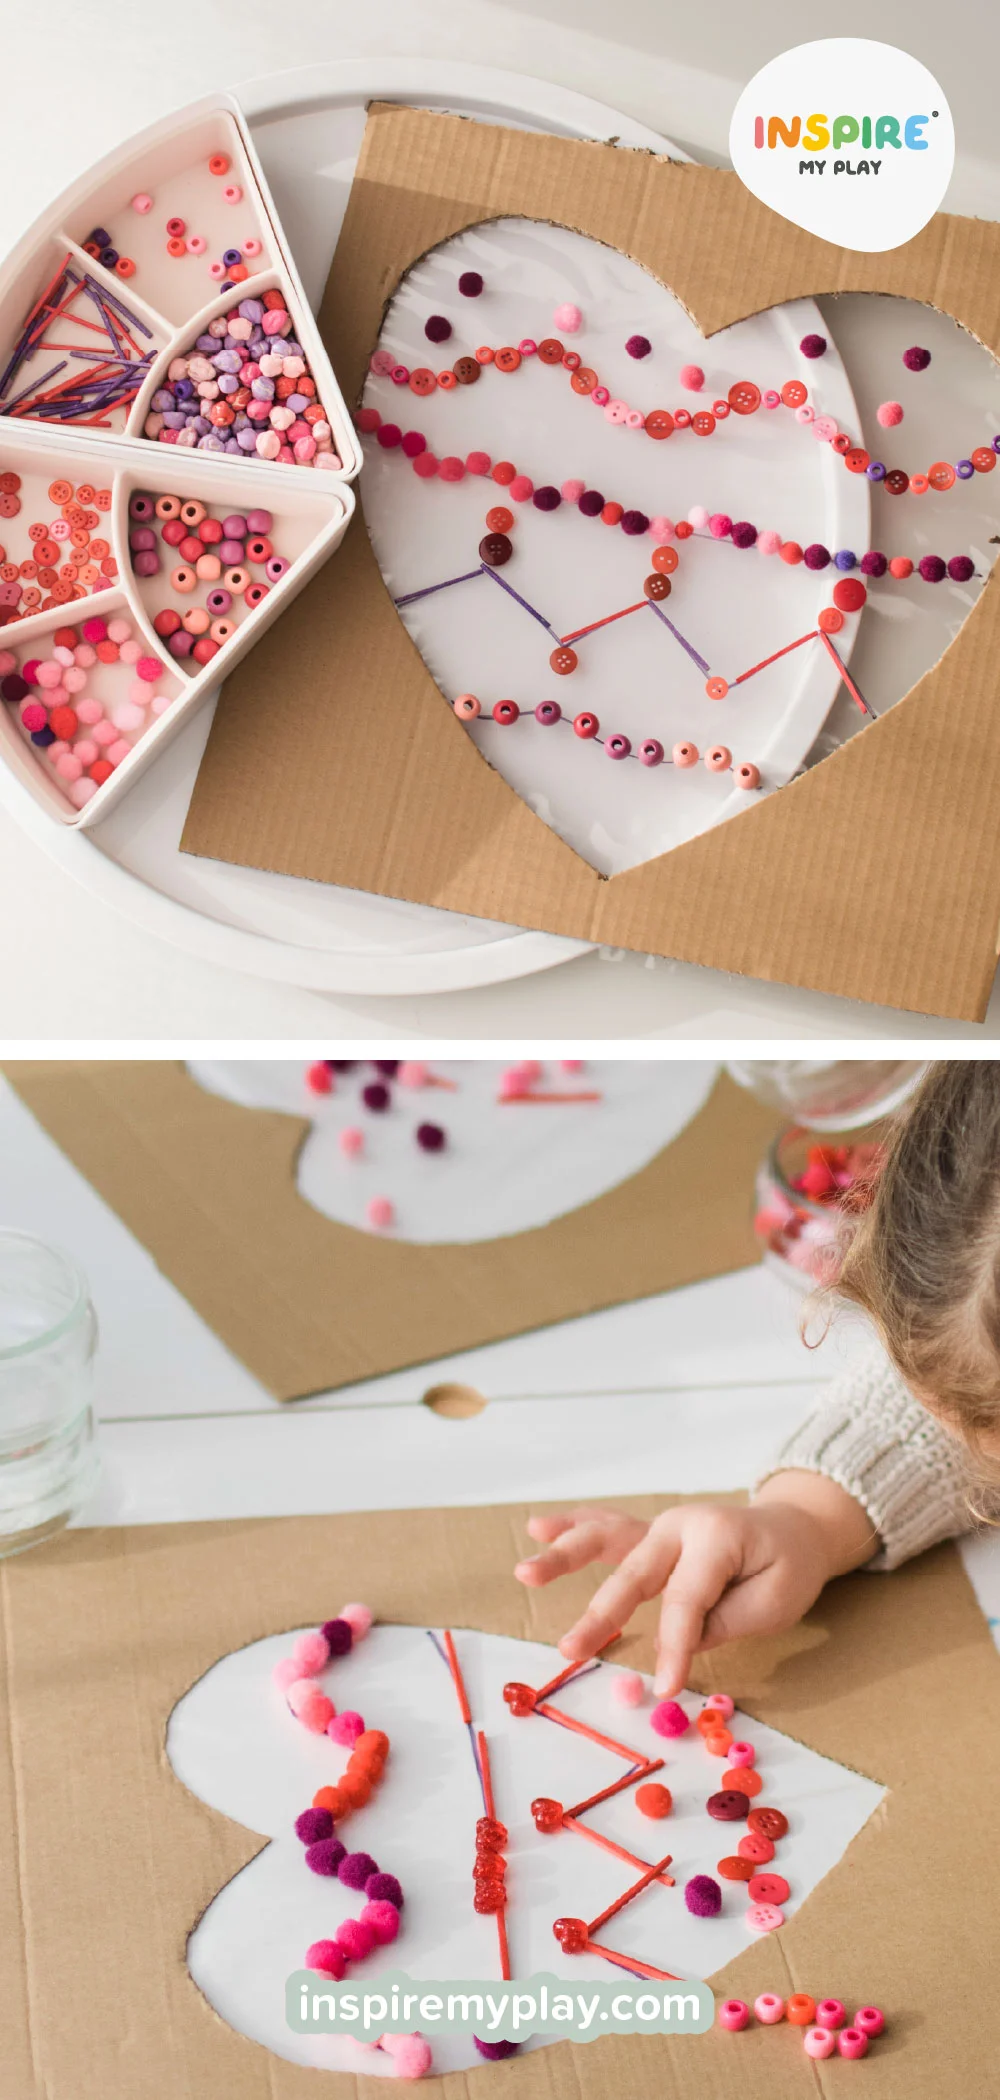
Following the lines is a fantastic fine-motor challenge, while younger children can simply enjoy decorating freely. The stickiness lasts surprisingly well, and the materials peel off easily—meaning you can reuse them again and again
2. Marbled Hearts

One of our all-time favourite craft activities! Shaving-foam marbling creates the most beautiful, vibrant patterns—and the process is just as joyful as the result.
Top tip: Use glossy photo card for richer colours and instant drying.
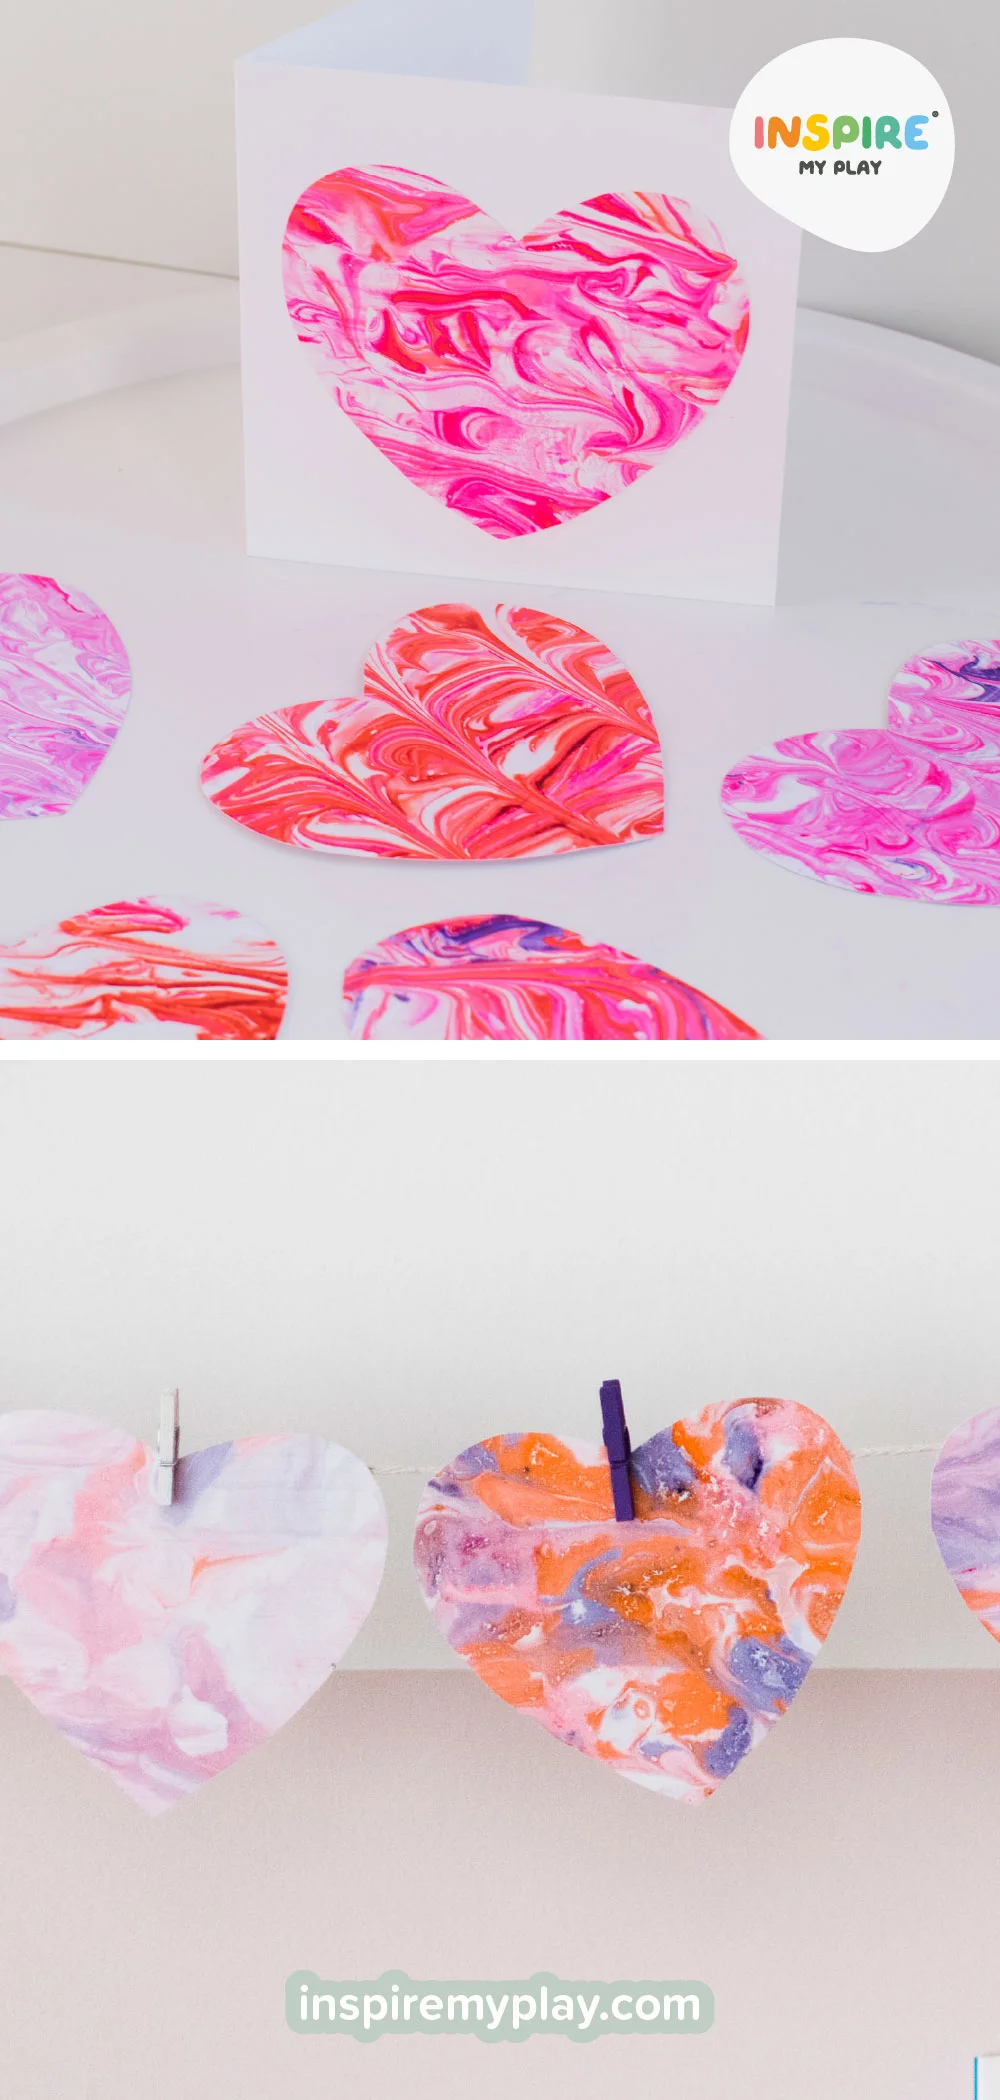
How to make them:
- Spread shaving foam over the PlayTRAY.
- Add a few drops of food colouring.
- Swirl the colours around using the end of a paintbrush.
- Press the card gently onto the foam.
- Lift and scrape off any excess, and admire the marbling magic!

You can repeat the marbling process several times before needing to refresh the colours. We ended up going through multiple trays of shaving foam because the kids were enjoying it so much! Once you’ve scraped off the excess foam, simply cut the card into heart shapes. These make beautiful handmade cards or can be strung together to create a Valentine’s garland.
3. Heart Stick Wands

These heart stick wands were such fun to make! We started by collecting sticks on a walk, then set out a selection of materials in the PlayTRAY for the children to decorate them with. Wrapping wool or yarn is a wonderful fine-motor challenge, but younger children can easily paint the sticks or add bio-glitter instead.
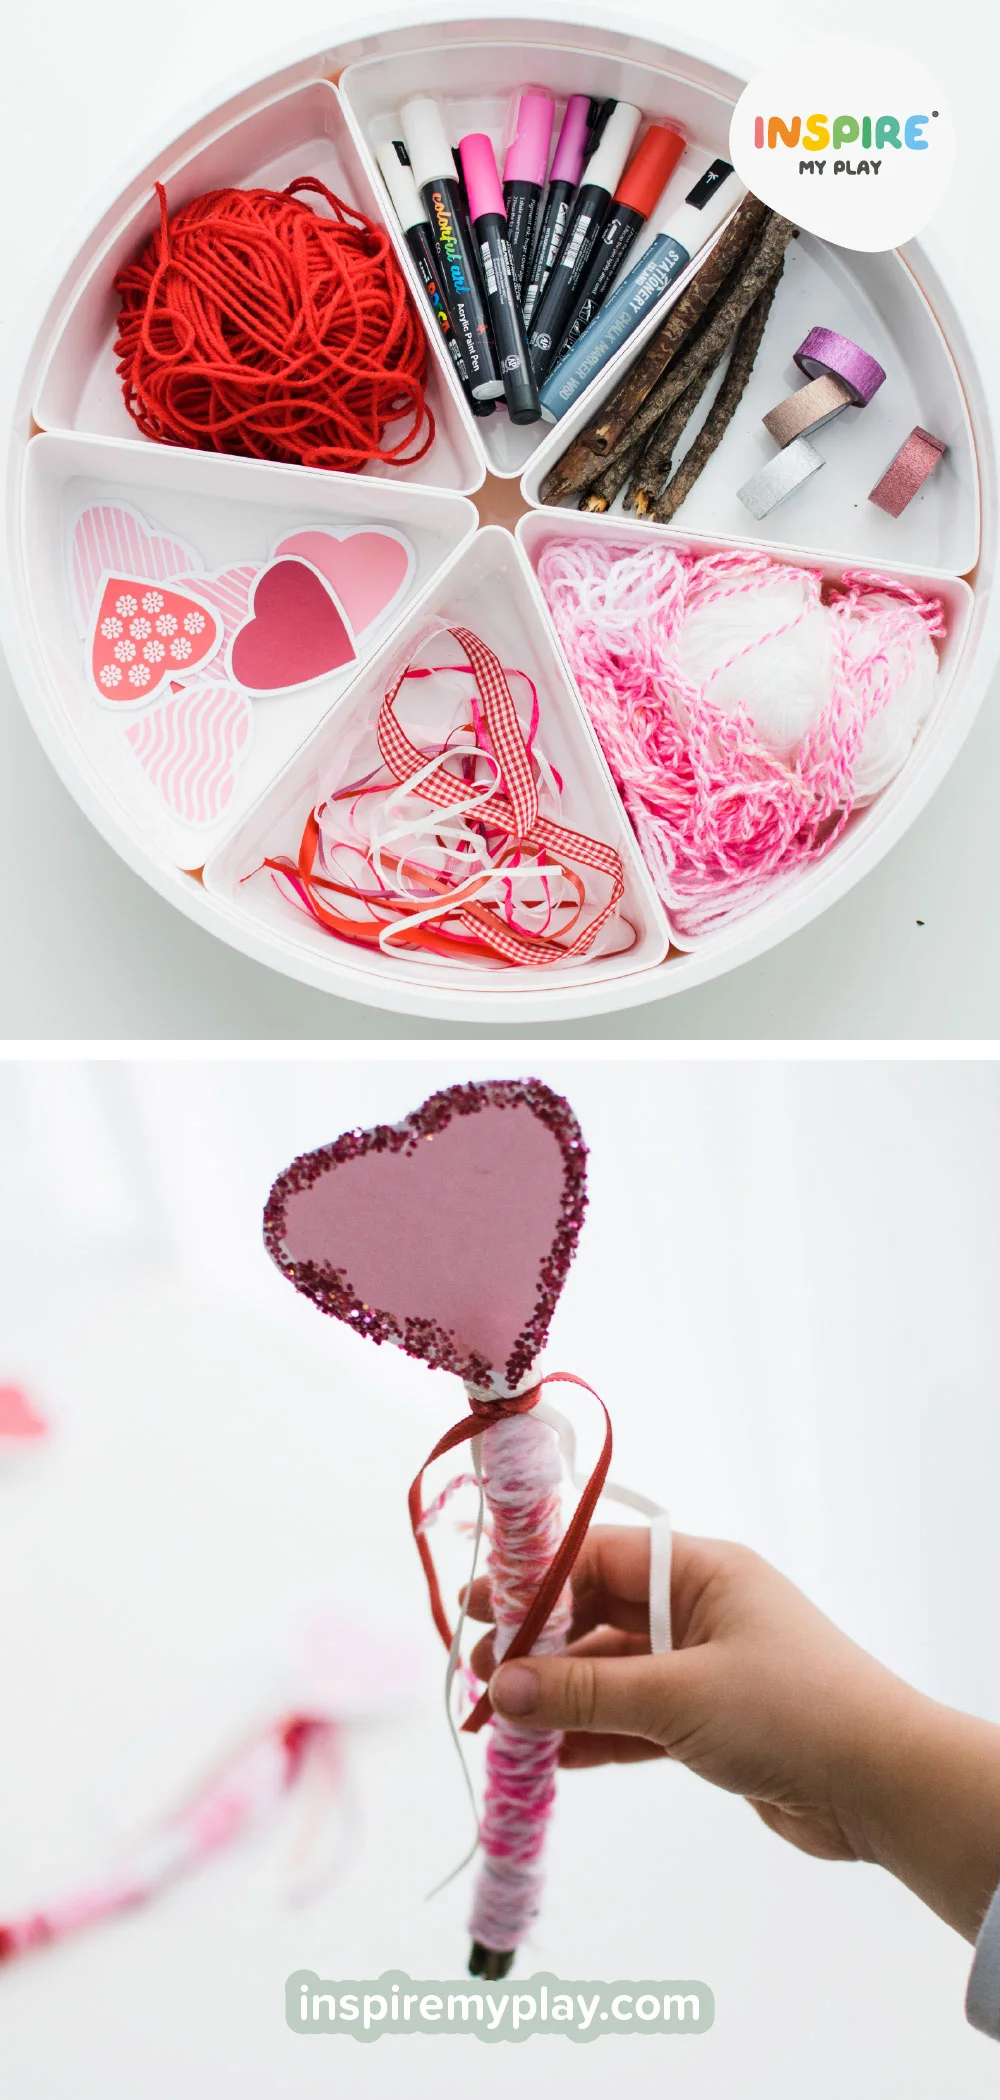
Once decorated, we added a cut-out heart to the top of each stick and tied some ribbons for a magical finishing touch.
You can download the printable hearts for free here.

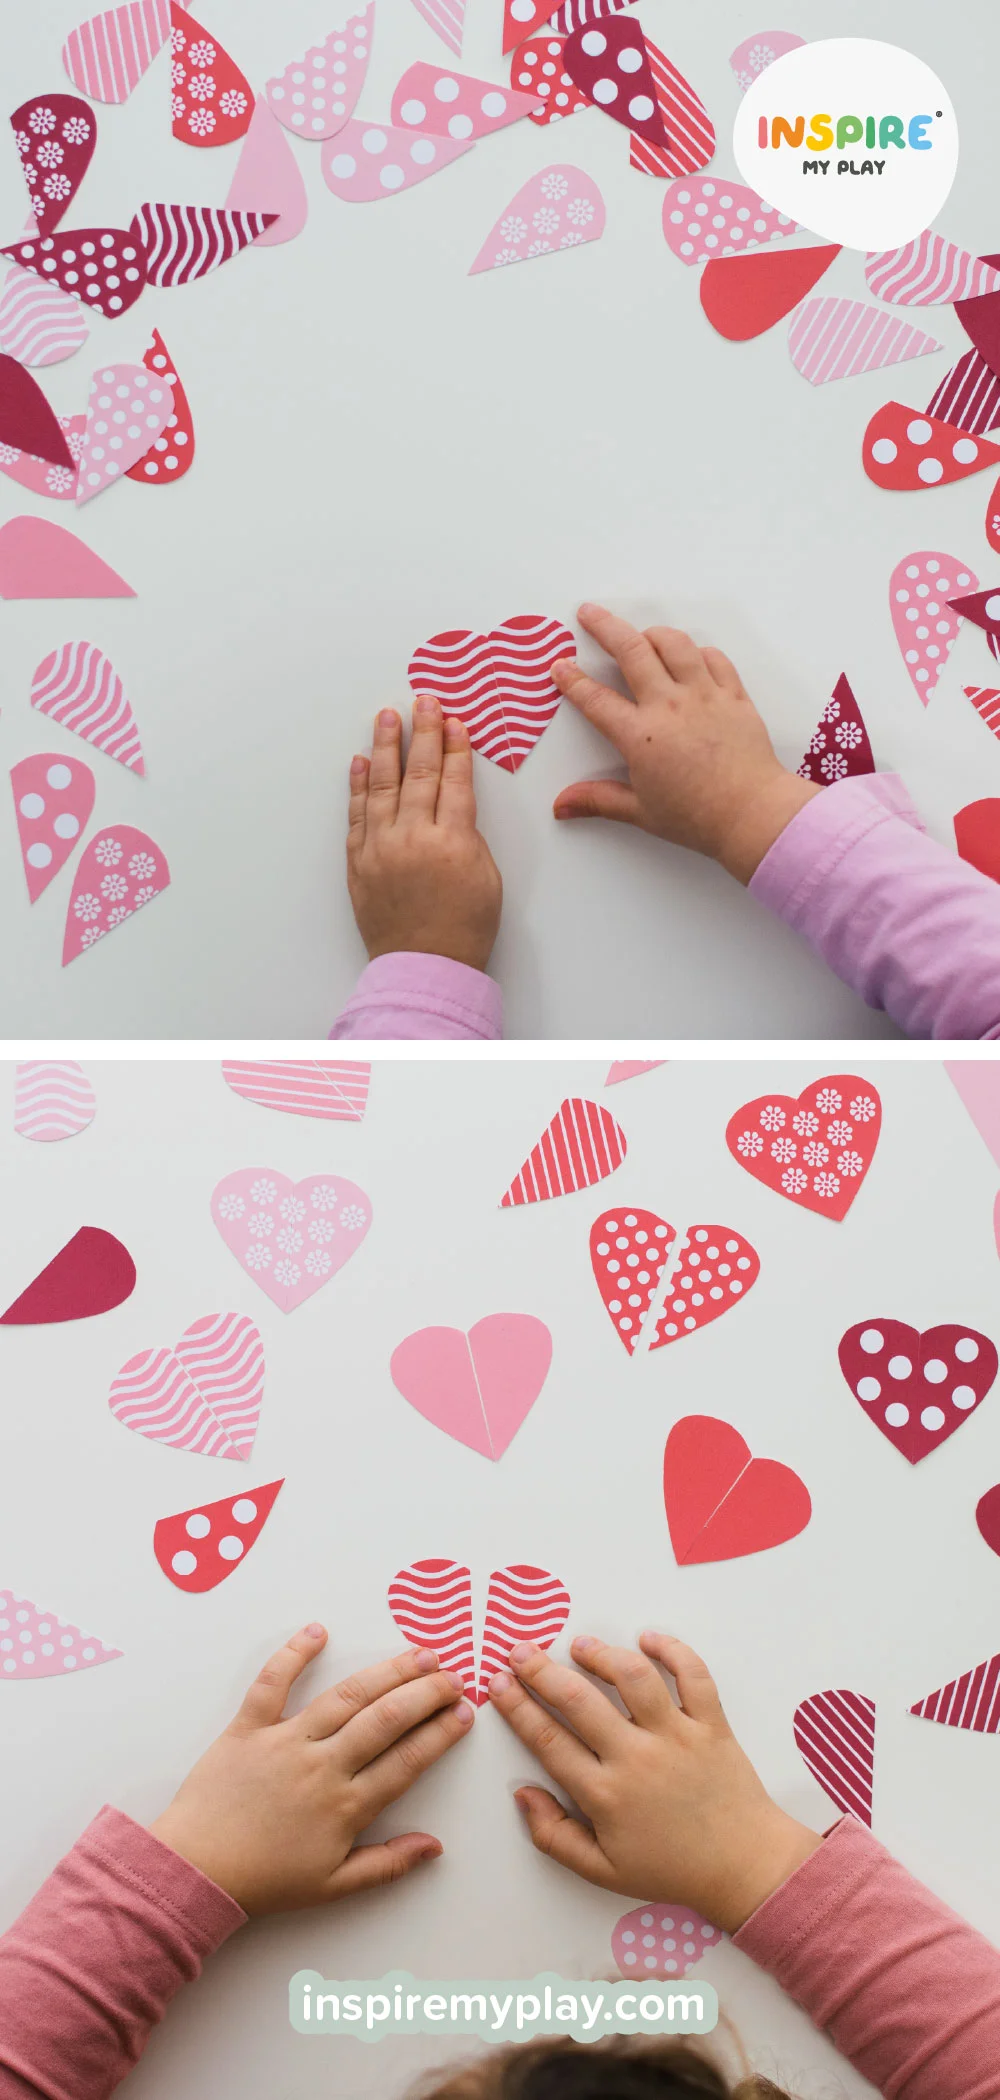
Heart Pattern Match Activity

Turn the same printable hearts into a fun and engaging matching game! These heart pattern cards offer a lovely challenge for children as they work to match not only the patterns, but also the different shades of pinks and reds. It’s a simple way to support visual discrimination skills and early problem-solving.
To set up, print the hearts, cut each one in half, and mix them up. Children can then search for the matching halves and piece them back together. For an added layer of excitement, try hiding the pieces around a room or in the PlayTRAY.

If you’re playing with younger children, reduce the number of pairs you set out or use just one of each colour/pattern to make the activity more accessible. It’s a wonderfully flexible game that can be adapted to suit different ages and stages—all using the same free printable!
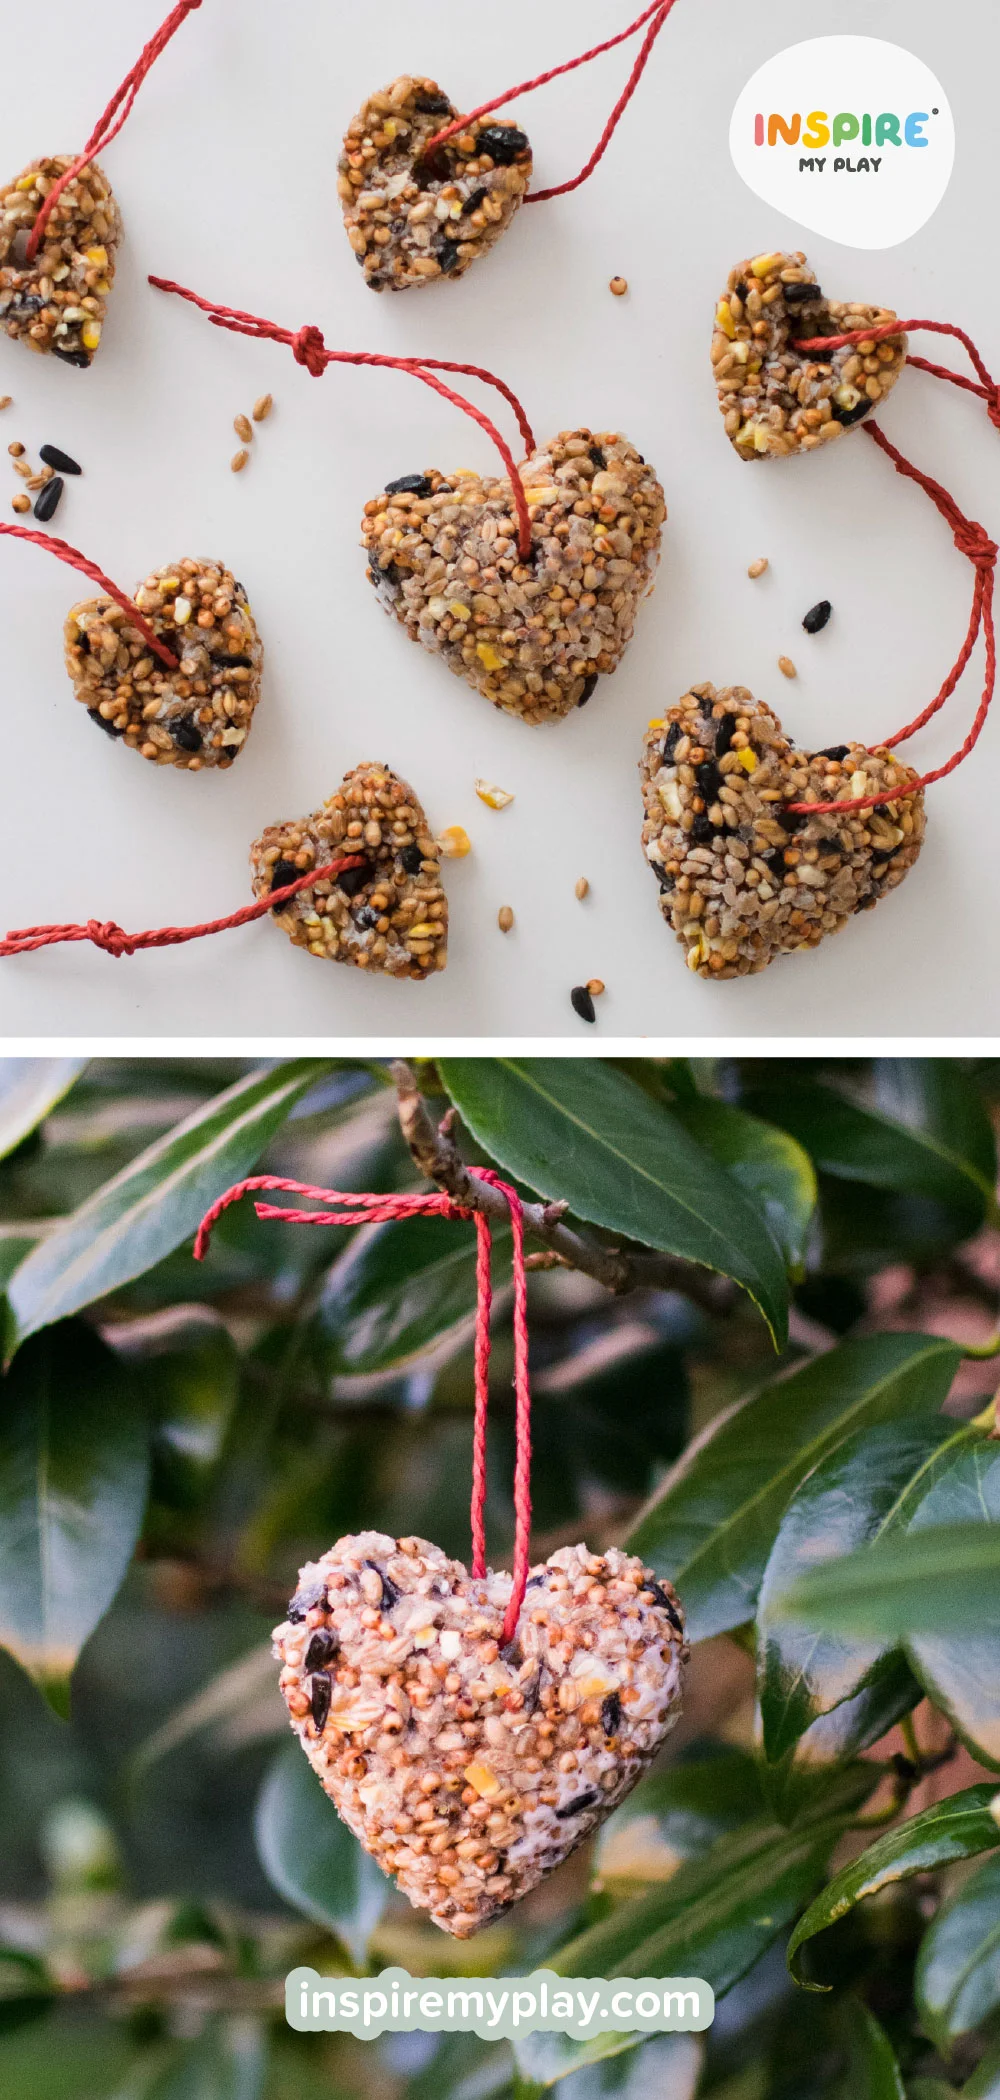
Heart Bird Feeder
If you’ve made bird feeders with cookie cutters before, you’ll know they don’t always hold their shape! After a bit of trial and error, I’ve discovered a method that works perfectly every time. To celebrate Valentine’s Day, we used it to make some heart-shaped treats for the birds.
You’ll need:
- Birdseed
- Gelatine
- Silicone heart mould
- Twine
How to make them:
- Make up the gelatine following the packet, but skip the extra water.
- Fill your silicone heart moulds with birdseed.
- Pour gelatine over the top—just enough to cover the seed.
- Chill until it starts to set, then use a pencil to poke a hanging hole.
- Pop back in the fridge to set fully (overnight is ideal).
- Gently pop them out, thread on some twine, and hang outside for the birds!
They stay together brilliantly, which means no messy crumbling– just lovely little hearts ready for the birds to enjoy.
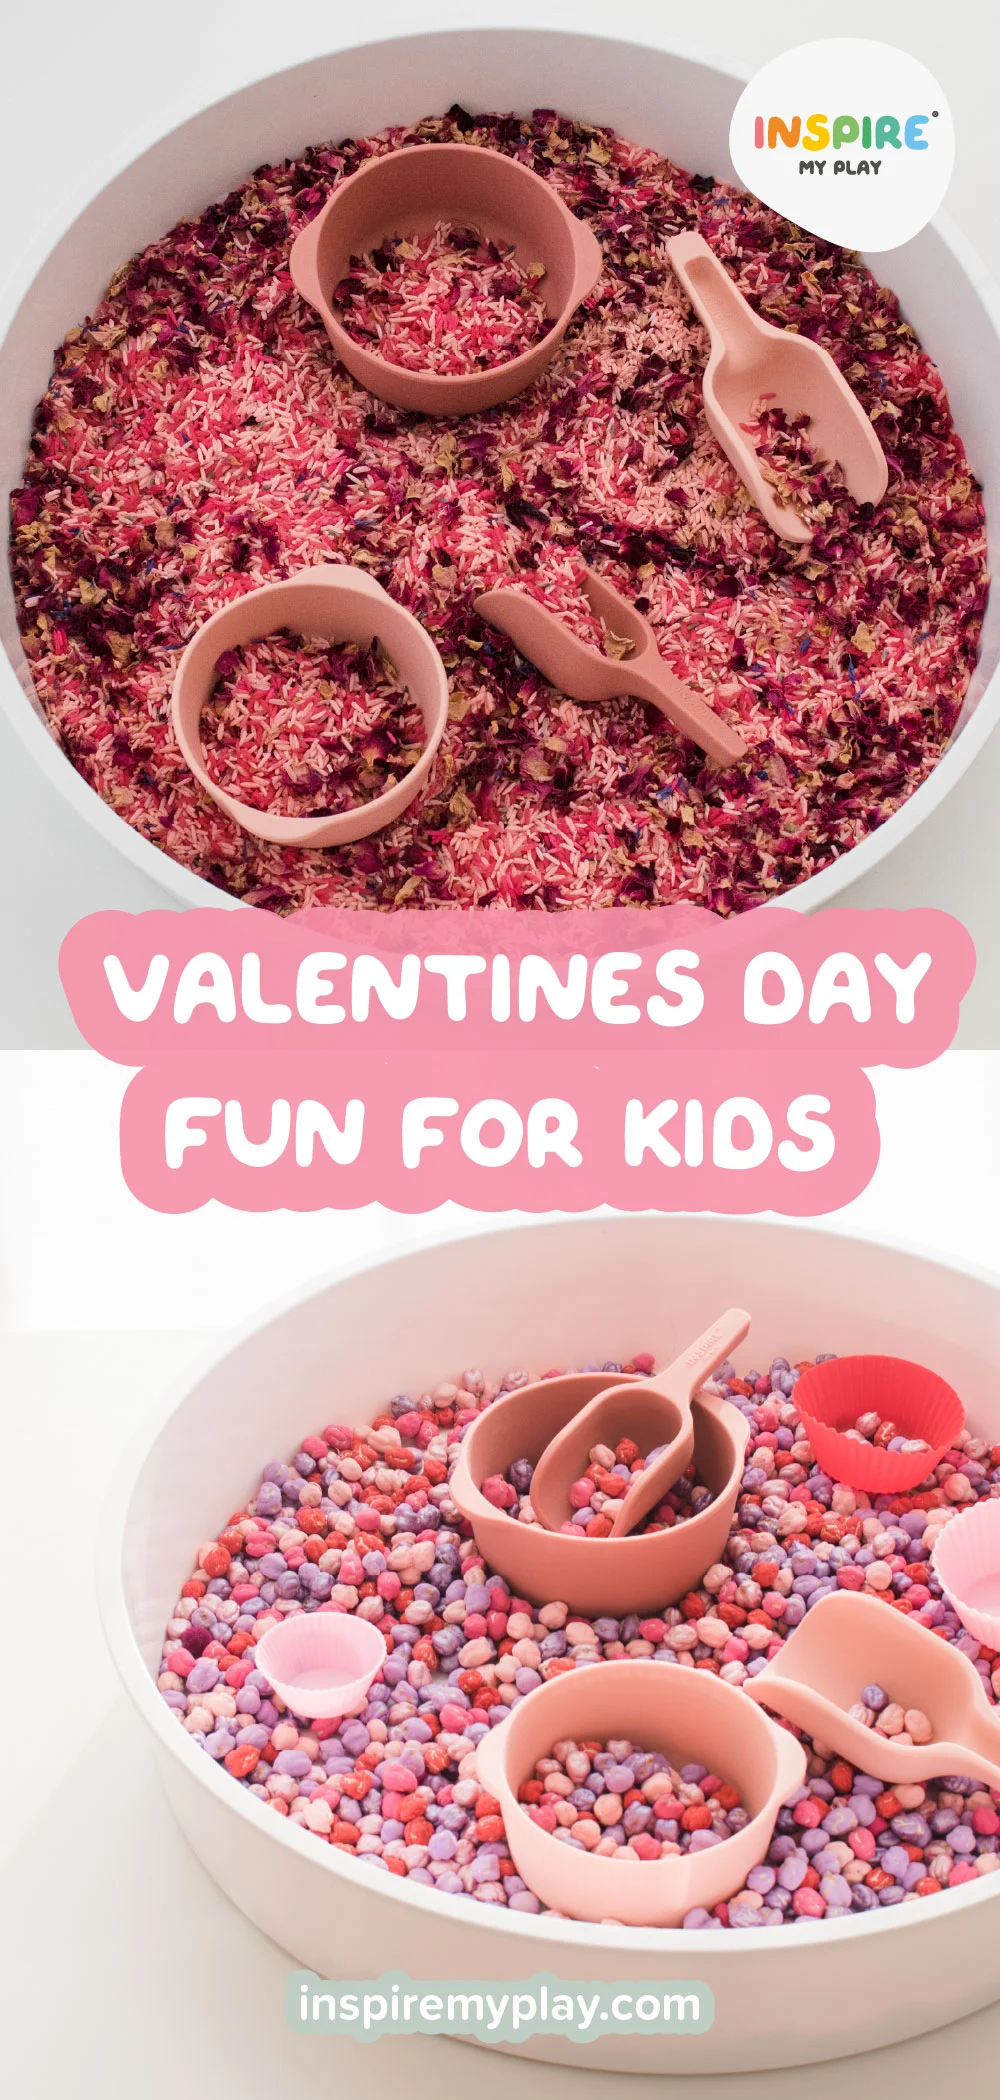
Pink Chickpeas
Coloured chickpeas are such a fun, tactile base for sensory play. Kids love scooping, pouring and filling them—and honestly, it never seems to get old!
Colouring them is super quick too:
- Pop some dried chickpeas into a bag or jar and add a squirt of tempera or ready-mix paint.
- Give it a really good shake (kids love helping with this bit!).
- Tip them out onto a tray to dry.
Once they’re ready, set them out with bowls, scoops, cupcake cases and let little hands explore. The sound, the colour, the feel all help with developmental learning.
Just a note: Chickpeas can be a choking hazard, so make sure to keep a close eye on younger children while they play.
Valentine's Bubble Foam
Bubble foam is such a fun, fluffy twist on regular water play, and it always goes down a treat!
You’ll need:
- ½ cup tear-free bubble bath (or dish soap but just be aware this may sting their eyes if they rub them.)
- 1 cup water
- A little food colouring
- A mixer or blender
Here’s how to make it:
- Pour the bubble bath and water into a bowl.
- Add a few drops of pink or red food colouring.
- Whizz it up with a mixer until you get those lovely stiff, foamy peaks.
- Scoop the foam into the PlayTRAY and pop in bowls and scoops.
- Toy ice cream cones and pom poms always go down really well!


If the foam starts to settle (which it often does after a bit of play), just give the leftover liquid another quick mix and it’ll fluff right back up again.
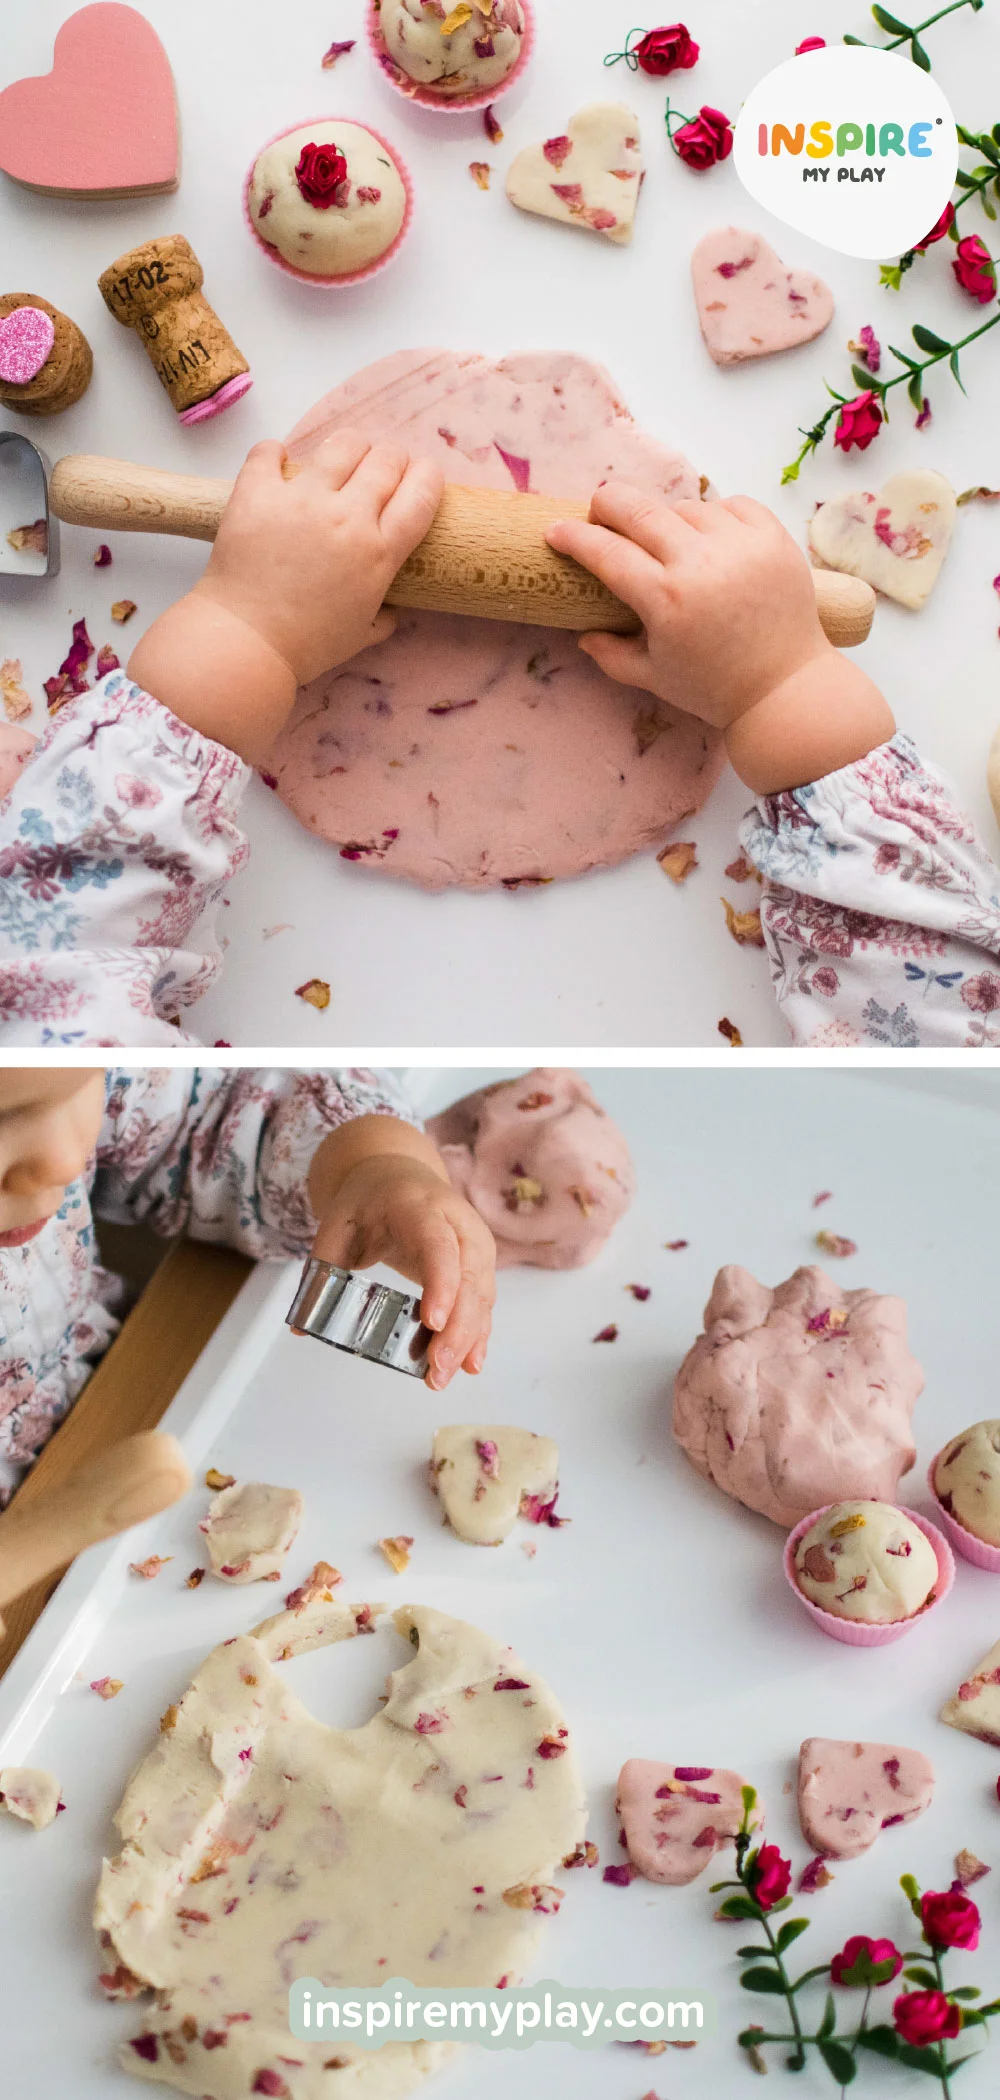
Petal Play Dough
This pretty petal play dough is perfect for Valentine’s Day or any time you want to add a little floral fun to your sensory play. Homemade play dough is wonderfully soft, lasts for ages, and is such a great fine motor workout for little hands.
Don’t forget—you can download our FREE recipe printable to make this activity even easier to set up!
What You’ll Need
- 1 ½ cups plain (all-purpose) flour
- ½ cup salt 2 tbsp cream of tartar
- 1 cup boiling water
- 2 tbsp coconut or vegetable oil
- Food colouring (optional)
- ½ cup dried petals
How to Make It
- Mix the flour, salt, and cream of tartar in a bowl.
- Add food colouring to the boiling water (if using), then stir in the oil.
- Pour the wet ingredients into the dry mixture and add the dried petals.
- Knead until smooth, adjusting with a little extra flour or water if needed.
We paired our dough with cookie cutters, silicone cupcake cases, and mini roses for a lovely invitation to create or pretend “baking” play.
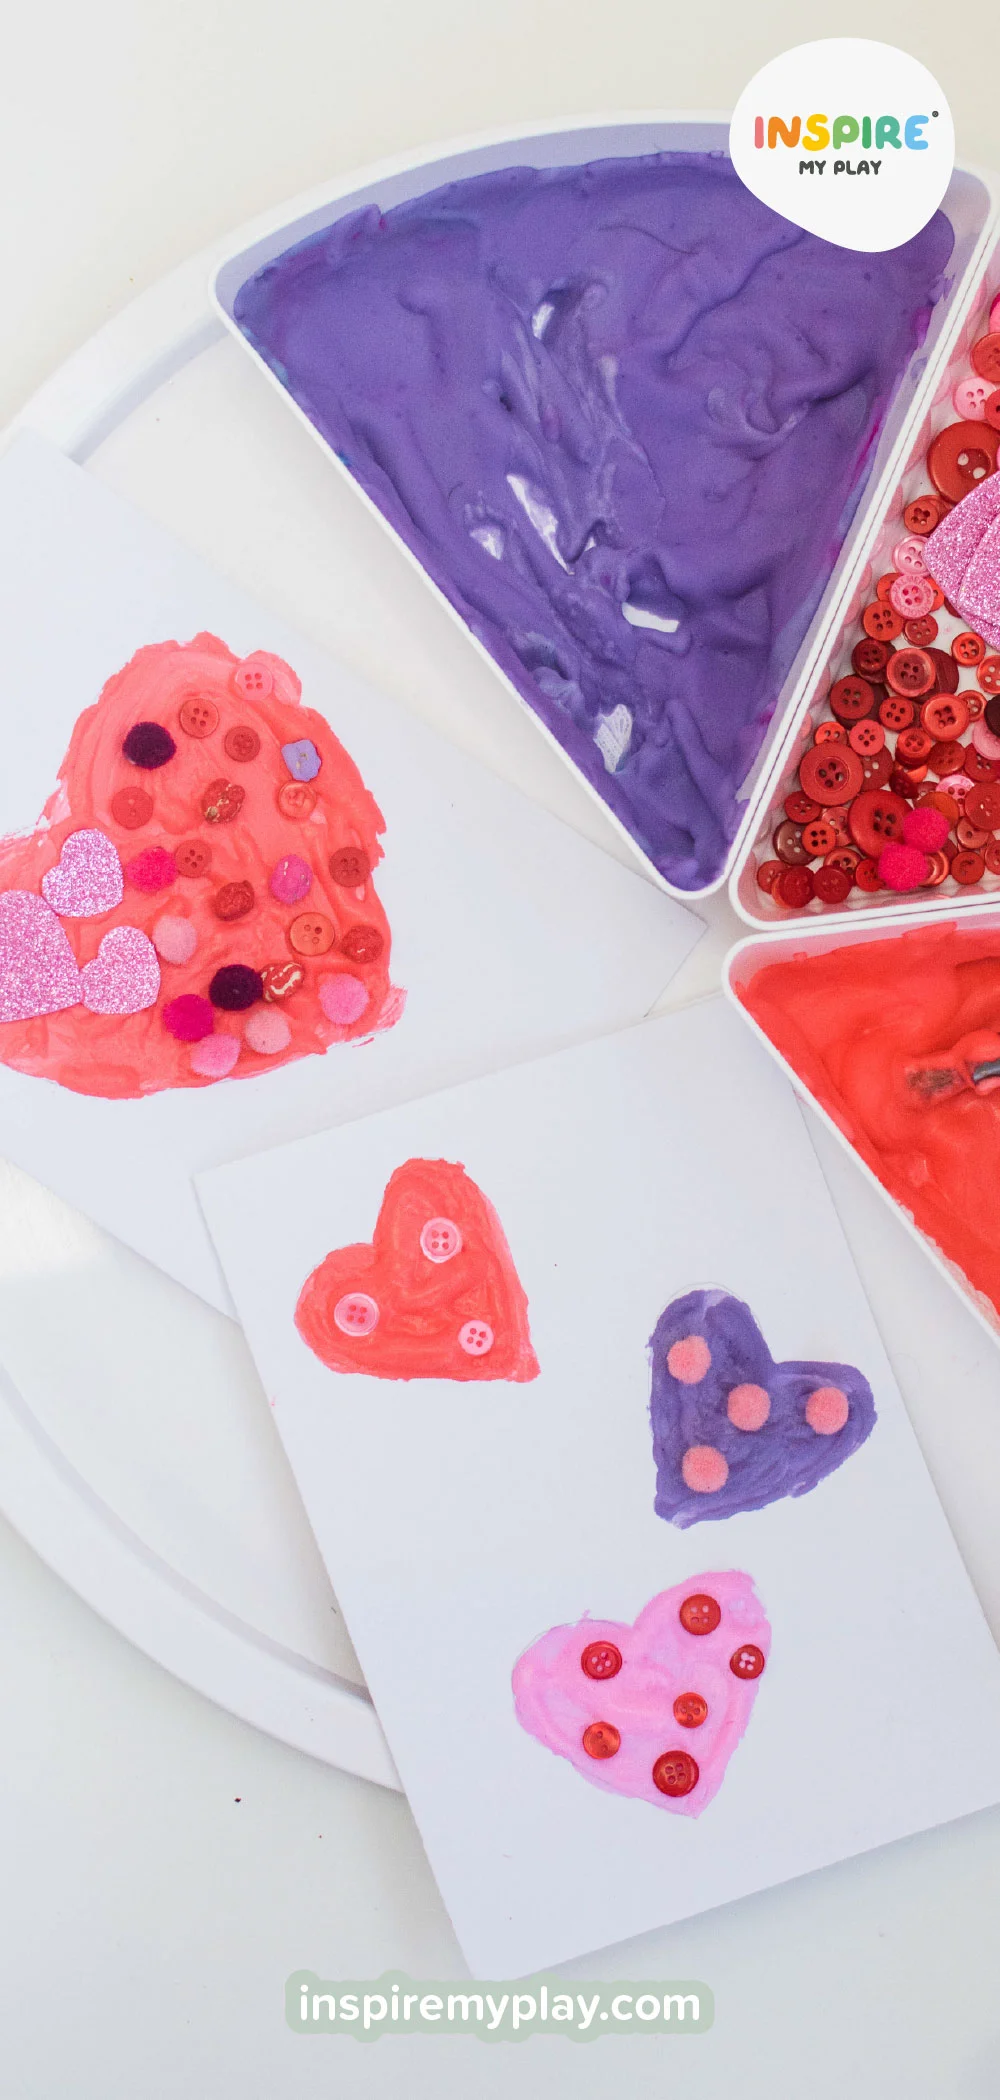
Puffy Paint Hearts
Puffy paint is a combination of shaving foam & PVA (school/white glue) and is such a fun texture to paint with! When it dries, puffy paint is squishy and soft to touch. It’s the perfect activity for preschoolers and toddlers!
To make puffy paint you will need:
- Shaving foam
- PVA/school glue
- Food colouring
Mix roughly equal amounts of shaving foam and glue together, don’t worry if it’s not exact. Add a drop or two of food colouring and mix until smooth. Decorate with craft bits or sprinkle with bio-glitter!
Valentines Day Love Bug Craft
Here’s a really sweet craft to make with little ones this Valentine’s Day! Our flapping Love Bug is simple, colourful and made mostly from recycled bits and bobs. With a pull of a string, the wings flap open to reveal a little hidden message—such a cute surprise!
Here’s how to make your Love Bug:
- Start by cutting out two heart-shaped wings.
- Decorate them with tissue paper, little hearts or whatever crafty bits you have to create a fun patchwork look.
- Next, paint or colour in a toilet roll tube and add a little face and any features you like. For the antennae, colour two cotton buds black and glue tiny paper hearts on the ends, then attach them inside the tube.
- Hold the wings against the back of the tube and make a small hole through both the wings and the tube—this is where your split pin will go. Secure the wings in place with the pin.
- Now make a second small hole in each wing. Tie a piece of string to each hole, then thread both ends of the string down through the tube. Tie them together at the bottom and add a bead.
- Give the bead a little pull and watch the wings flap open to reveal your hidden message! Kids absolutely love this part.
Petal Perfume
Before you throw out those wilted Valentine’s flowers, save them for a bit of potion and perfume play! Fading tulip petals are perfect for adding colour, texture, and a touch of magic to a simple sensory setup.

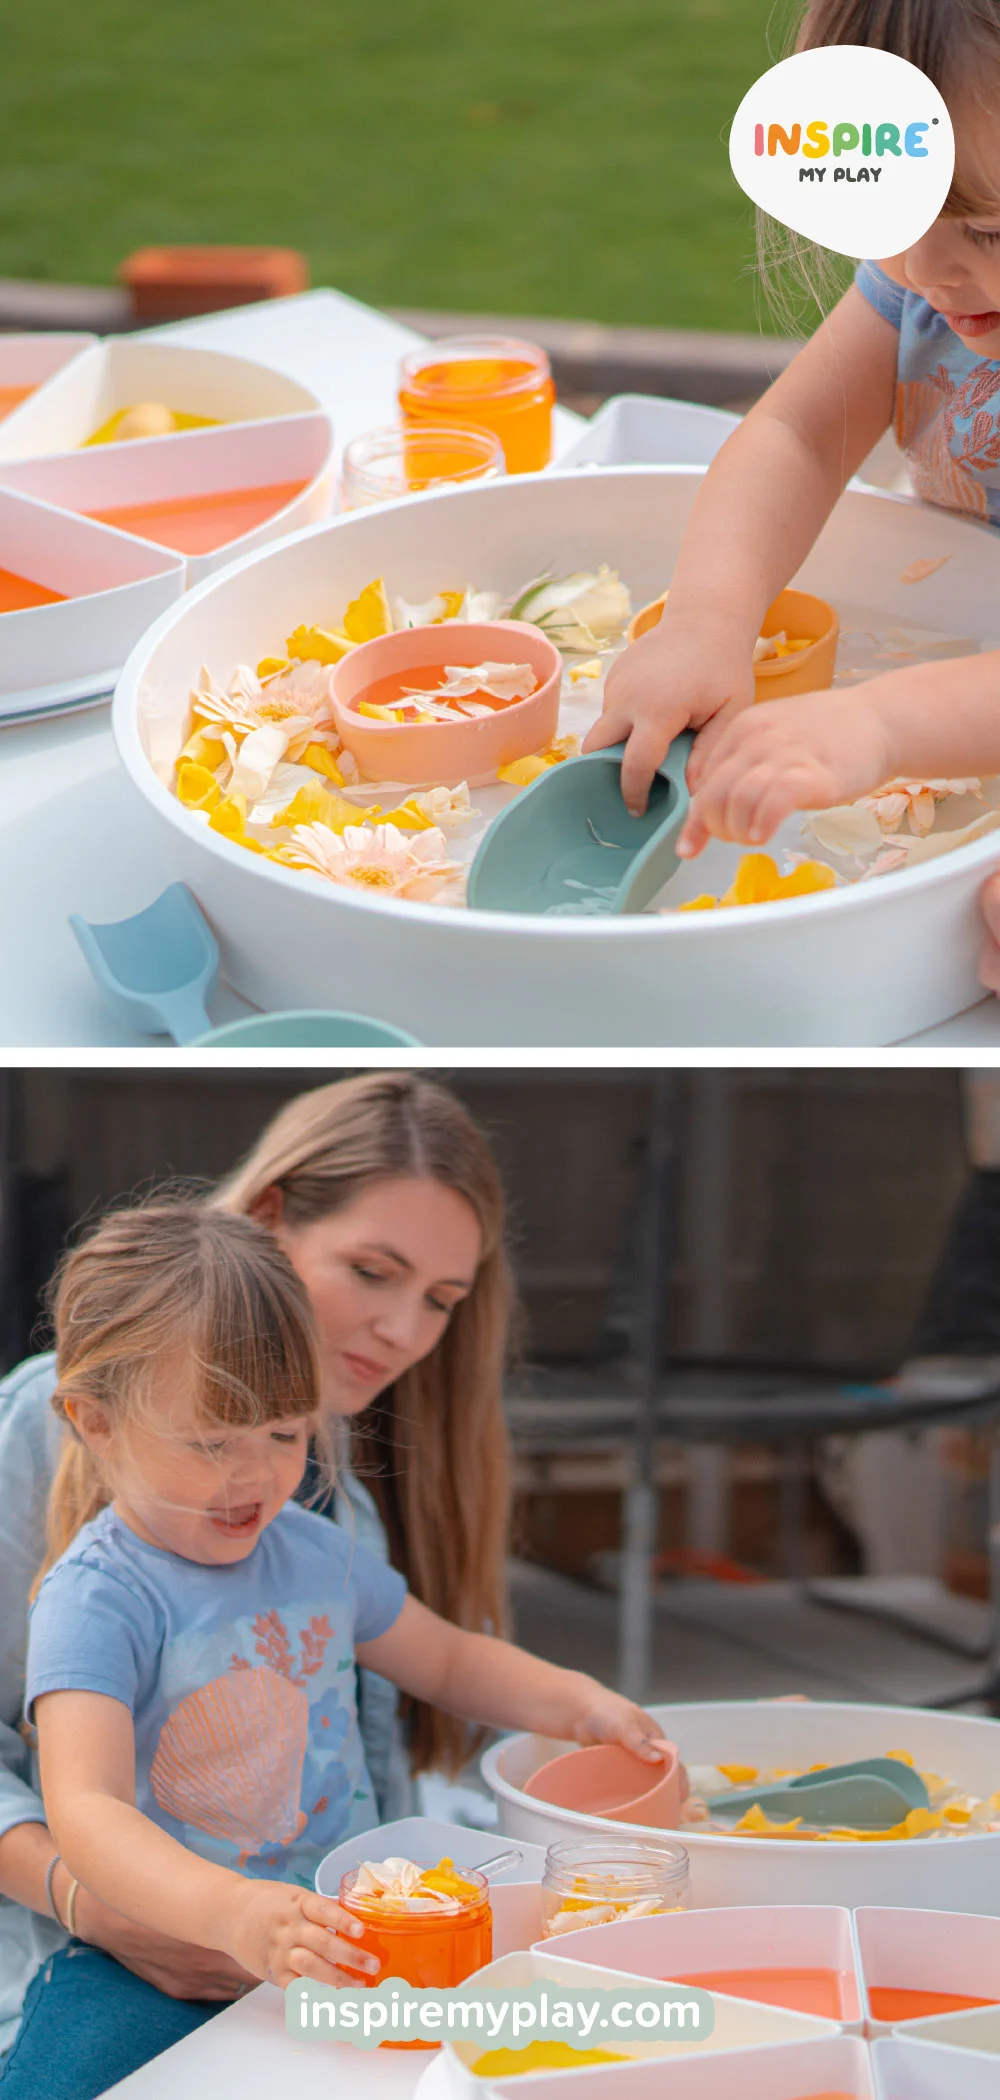
I filled the compartments of our Inspire My Play PlayTRAY with pastel-coloured water — just a tiny drop of food colouring is all you need. My youngest loved using droppers to transfer the colours into her little “perfume pot,” before adding petals and a hint of essential oil for scent. It’s calm, creative, and wonderfully open-ended.

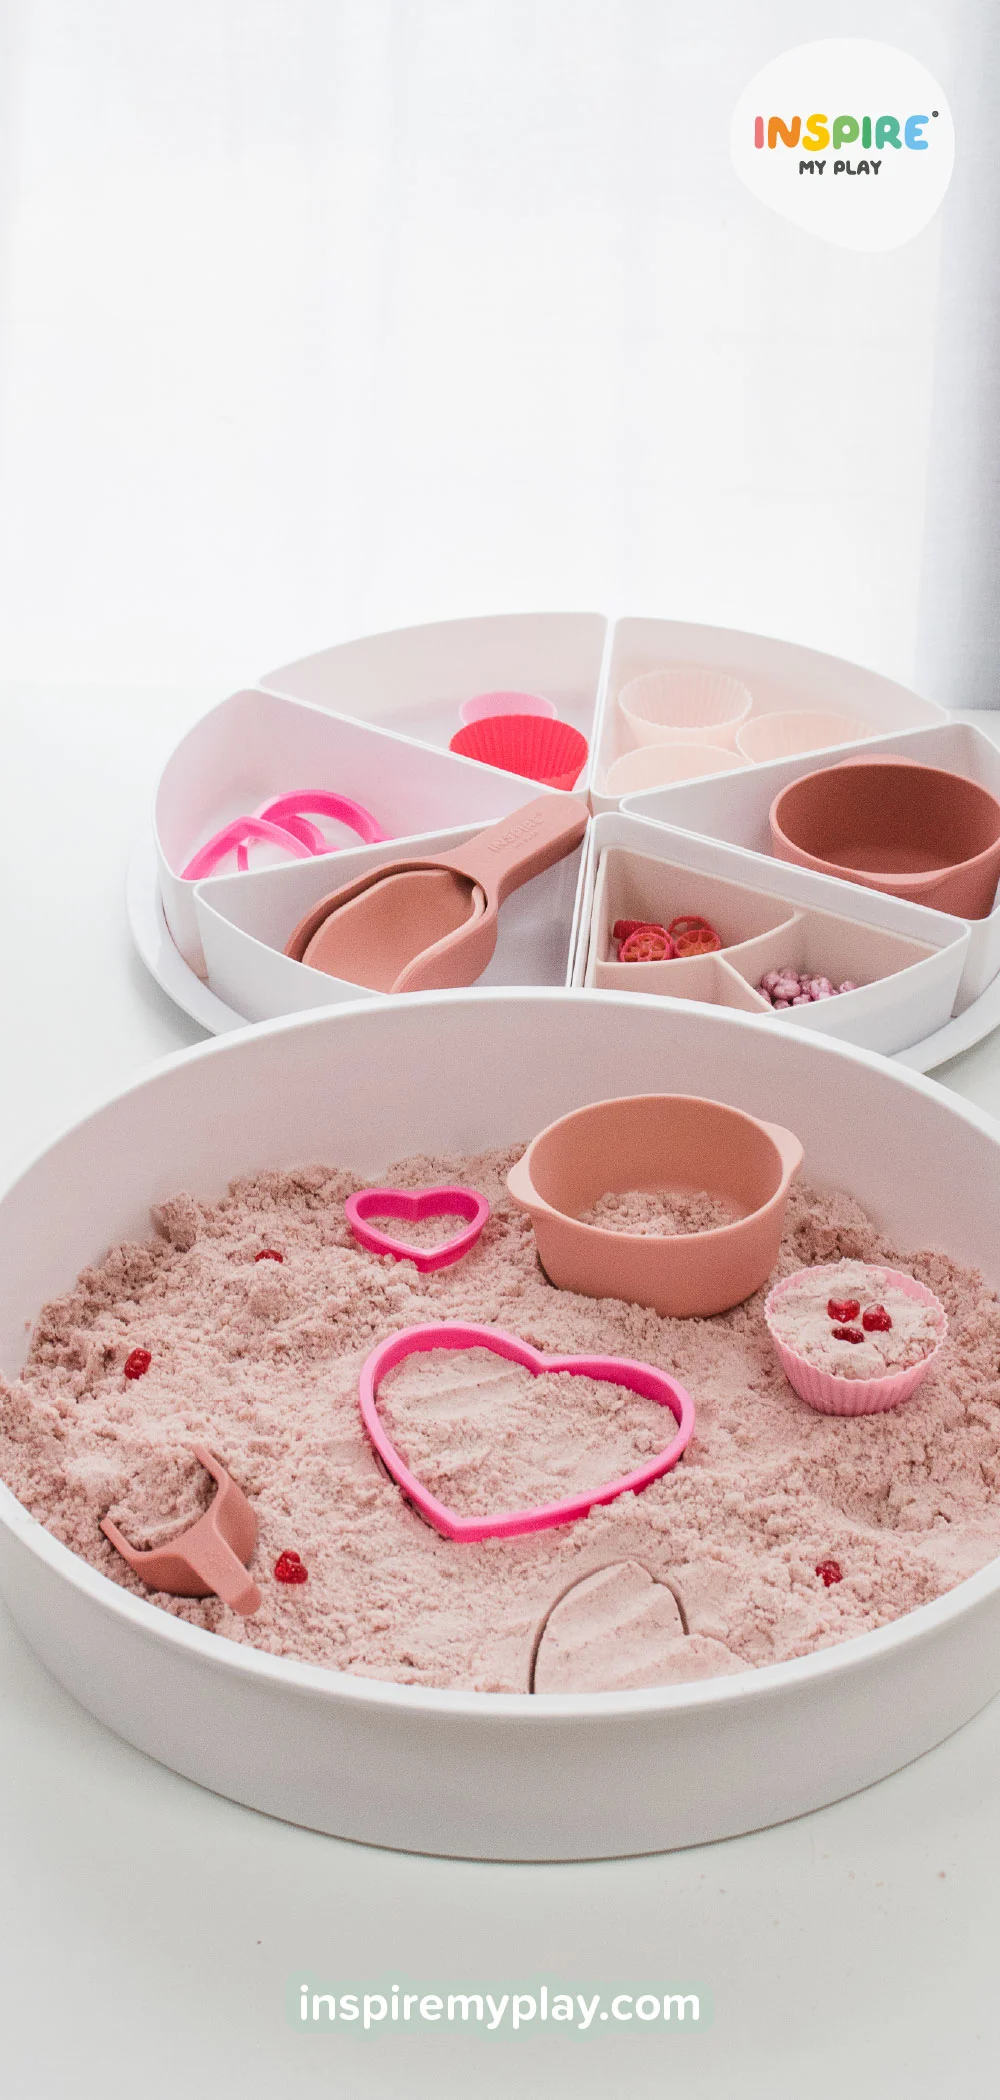
Valentines cloud dough

One of our favourite Valentine’s activities has to be this beautiful taste-safe pink cloud dough. The colour comes from beetroot powder, which gives it the loveliest rosy shade—perfect for celebrating the day of love!
To make your Valentine’s cloud dough, you’ll need:
- 4 cups flour
- ½ cup oil
- 1 heaped tsp beetroot powder
How to make it taste-safe:
Start by baking the flour to kill any bacteria. Simply spread it out on a baking tray and pop it into the oven at 180°C/350°F for about 10 minutes. (It’s still not meant for munching, but if little ones do sneak a tiny taste, there’s no need to worry.)
Once cooled, mix the flour with beetroot powder and oil in your tray. Use your fingers to rub everything together until it forms soft, mouldable cloud dough. Use cake cases, cookie cutters, loose parts (we used plastic hearts) and Inspire My Play tools for endless creative fun.
Top tip: Store your cloud dough in an airtight container to keep it fresh for longer.

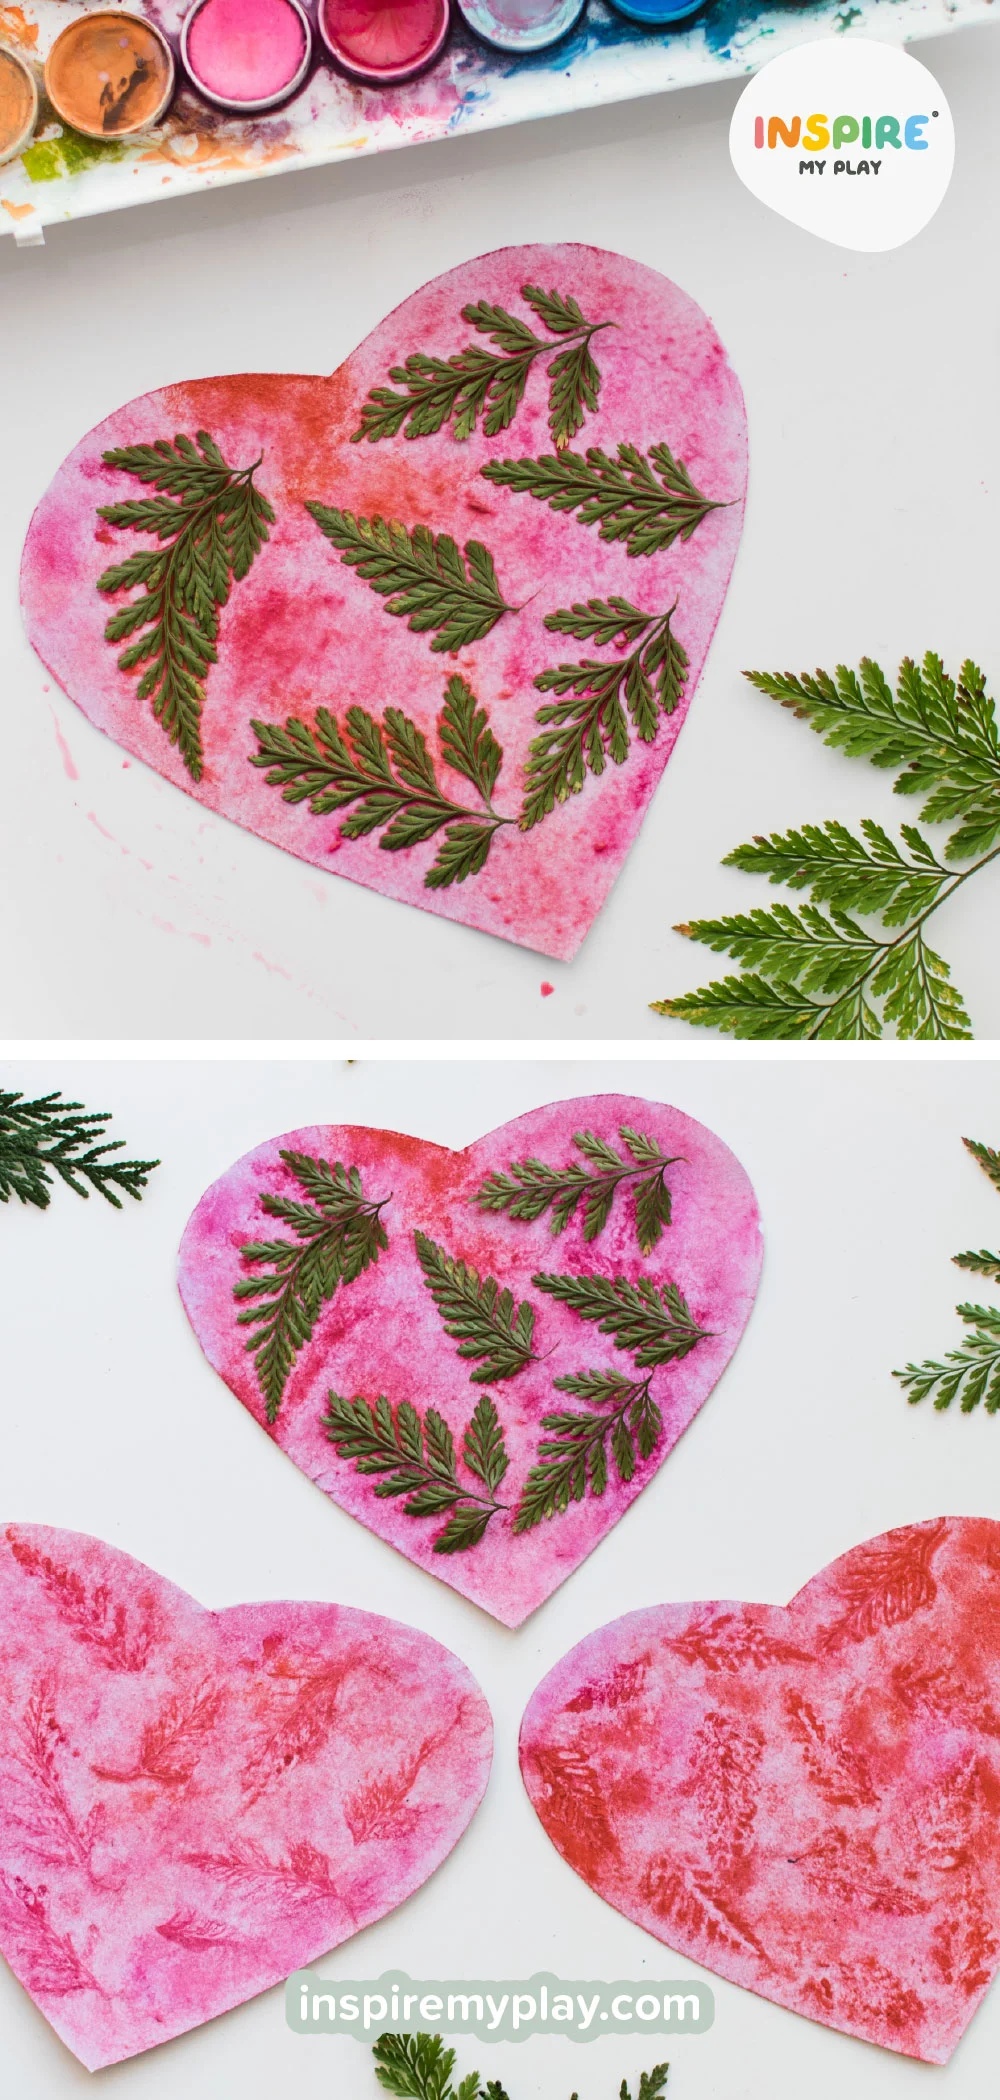
Watercolour Nature Heart Prints
Watercolour nature prints are one of our favourite process-art activities for kids. This printing technique is a favourite of ours and it’s an easy one to do with children, making it perfect for a relaxed, hands-on creative session. It’s a lovely way for little ones to explore natural textures, and you can use almost any plants or flowers you have to hand—ferns work especially well because of their delicate details.

You will need:
- Watercolour paints
- Thick paper or card
- Leaves or flowers
- Paintbrush
Method
- Prepare your background Brush your paper with watercolour paint, keeping the surface fairly wet to help the colours blend softly.
- Add your leaves or flowers Place your leaves onto the wet paint with the veins facing down to capture all those lovely natural details.
- Secure everything in place Gently paint over the leaves again so every part is pressed firmly onto the paper.
- Let it dry completely Leave your artwork to dry fully before removing the leaves—this ensures a crisp, clean print.
- Reveal your nature printOnce dry, lift the leaves to reveal the beautiful silhouette underneath. Arrange them in a heart shape for an extra-special finish.
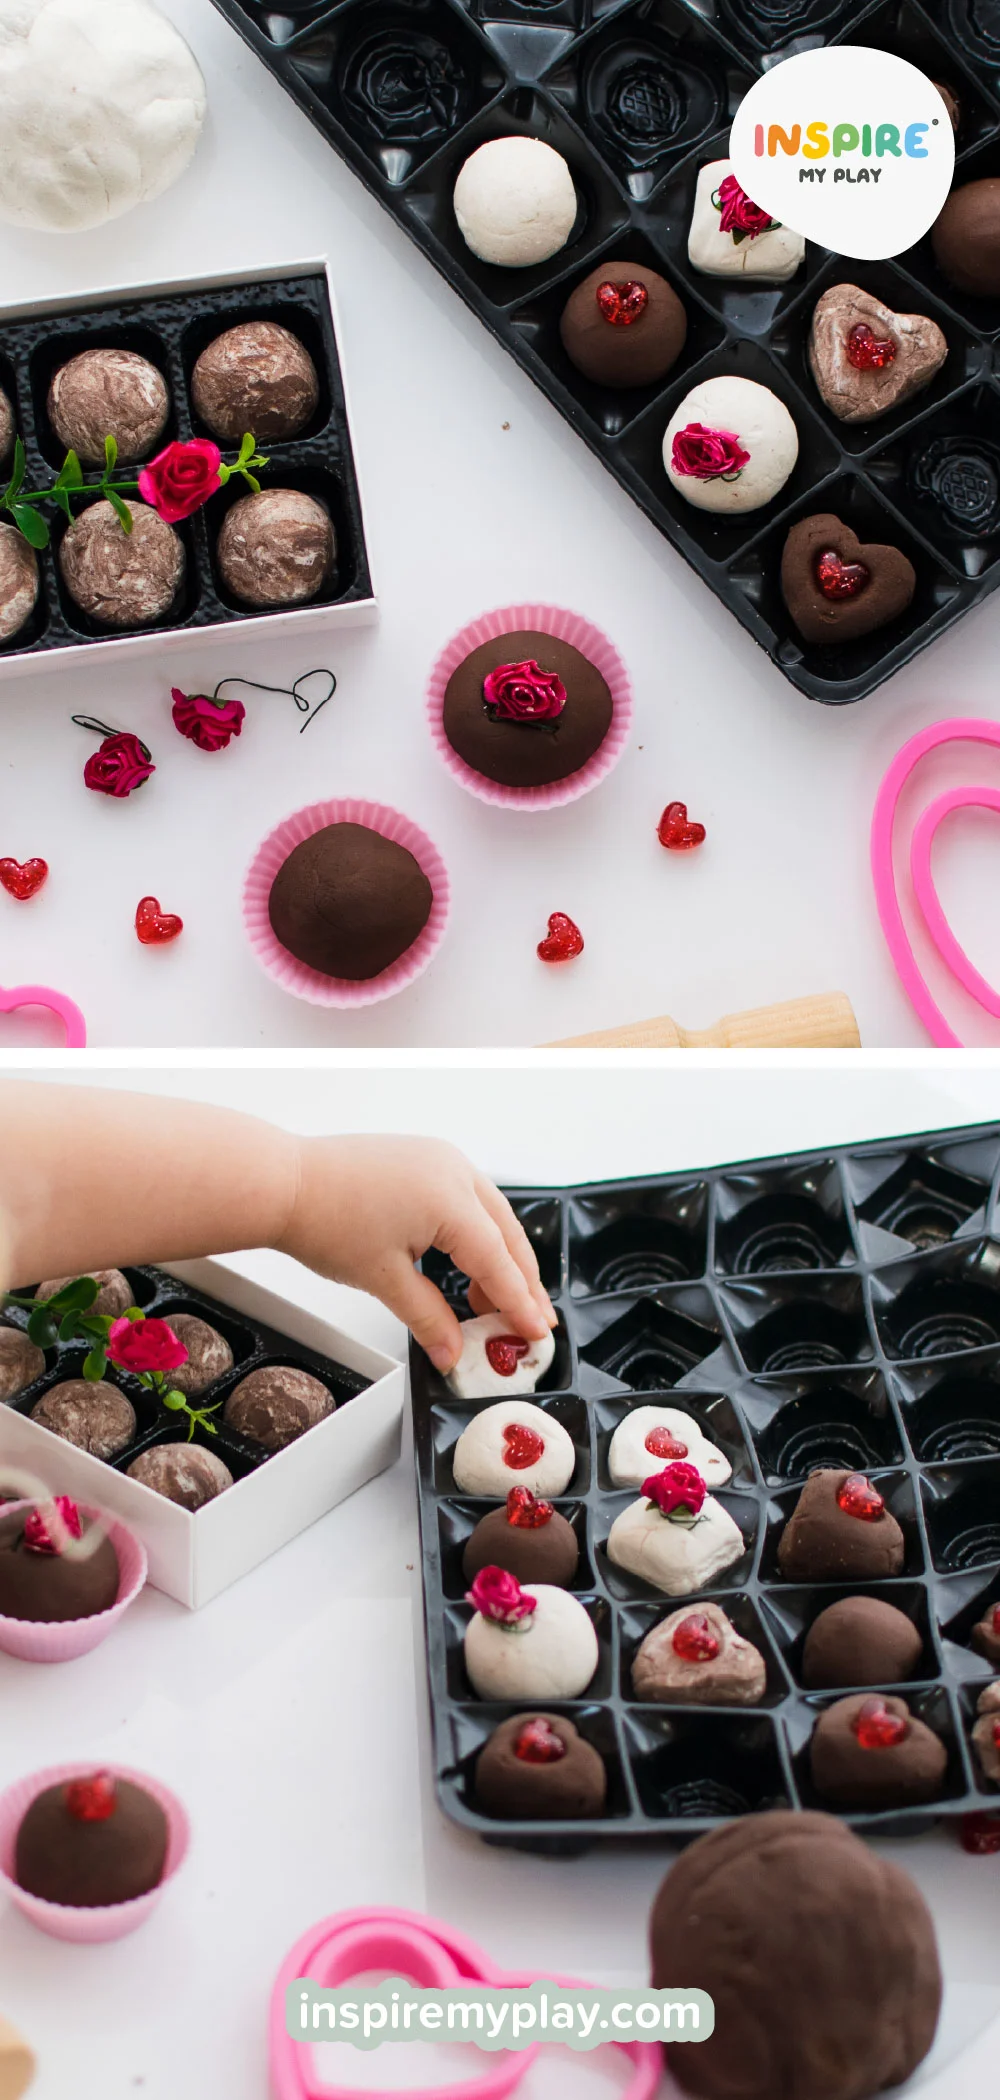
Play Dough Chocolate
Hold on to your Valentine’s chocolate boxes — they’re perfect for play! We used ours for a simple chocolate-making invitation with chocolate play dough, heart beads, and tiny roses for decorating.
Chocolate Play Dough Ingredients:
- 1 ½ cups plain (all-purpose) flour
- ½ cup salt
- ½ cup cocoa powder
- 2 tbsp cream of tartar
- 2 tbsp coconut oil
- 1 cup boiling water
Mix the dry ingredients, add the coconut oil to the hot water, then pour into the bowl. Stir until it forms a dough and knead well. Add a splash more water if needed. We also used a little white play dough (coloured with Wilton White Icing Colour) to make “white chocolate” and truffle swirls — so fun and so easy!
Valentine’s Oobleck
Oobleck—sometimes called gloop—is one of our go-to sensory play favourites at Inspire My Play. It’s wonderfully messy, full of surprises, and such a fun way for little ones to explore early science.
Try this soft pink Valentine’s version inspired by the lovely @engaging_elodie.
Ingredients
- 2 cups cornflour (cornstarch)
- 1 cup water
- A drop of pink or red food colouring
Method
- Add the cornflour to a shallow tray.
- Mix the colouring into the water.
- Slowly pour the coloured water into the cornflour, mixing with your hands.
- Adjust as needed—more water if it’s crumbly, more cornflour if it’s runny.
Then let the play begin! Kids can squeeze, scoop, tap, and drip the oobleck to discover its magical shifting texture. Simple, sensory, and so much fun.
Valentine’s Day is such a lovely excuse to slow down, get creative and enjoy some playful moments together. Whether you’re whipping up bubble foam, crafting love bugs or diving into pink cloud dough, we hope these ideas bring a little extra joy to your day. If you’re looking for more inspiration or the tools to make sensory play simple and accessible, pop over to inspiremyplay.com and explore our full range of play resources.
If you try any of these activities, we’d love to see! Share your play setups with us over on Instagram @inspiremyplay.
Happy Valentine’s Day and happy PlayTRAYing!


